

This post originally appeared on One Creative Mommy back in 2012. I'm re-posting it now because it's still one of my go-to gift bags, and a great way to use up leftover fabric!
I don’t know about you, but the commercialization of Christmas drives me crazy. Not only does it seem antithetical to the reason most people celebrate it, but Christmas consumerism creates a ridiculous amount of bad environmental waste in the form of uneaten leftover food, wrapping paper, unwanted gifts, ugly knickknacks, old decorations and so on and so forth.
So this year on top of trying to find eco-friendly gifts, I’m making gift bags that can be reused for years to come. In fact, these beautiful bags can even be a part of the gift! They can be re-gifted, or used for storing things or even as little purses. The bags are simple to make with a sewing machine, and the felt one is easy enough to make even without a sewing machine.
My grandmother made these drawstring bags for my sister and I when we were kids to hold things like Lego and Smurfs, and she hung them on hooks from the drawstring. She used old stockings instead of ribbon or braid to tie them up! My mum even recently made me one to hold my laundry dryer balls, so these are truly a cross-generational thing.
I’ve used some leftover velvet for these demo bags, but you can use pretty Christmas fabric, old bed sheets or t-shirts, or anything else you like.
What You’ll Need
- Two pieces of fabric, cut to any size rectangle you like. For these I cut 10×16”
- Ribbon, approx. 38” long
- Thread
- Sewing machine

Directions
2. Sew along the sides and bottom with a 5/8” margin, leaving the 2 ¼” at the top open. In this case I used a zigzag stitch because my fabric was stretchy. If using non-stretch fabric you can just straight stitch.
3. If your fabric is of a type that unravels easily, pink your edges
using pinking shears, this also gives it a nicer finish on the inside.
(Otherwise if you want a really pro look you could serge all your edges before sewing up the sides and bottom).
4. Press your sides and bottom open, making sure that you also press down the edges at the open top.
5. To make a casing for your cord or ribbon: on each side of the bag, fold the top down ¾” and press.
6. Fold down ¾” again. The folded edge should come just a little
below the side stitching. This is to help secure the side stitching and
prevent it from coming undone over time and under the pressure of being
opened and closed continuously.
7. Pin your folded edge down, especially where the two corners of the casing meet to prevent slippage.
8. Sew all along the bottom edge of the fold (again, I used a zigzag stitch for my stretchy fabric).
9. Clip the bottom corners of the stitching to reduce bulk in the corners. You can turn your bag right side out now.
10. Measure enough cord or ribbon to wrap around your bag 4 times, with
about 4” extra for tying the ends. (i.e. my finished bag was about 17”
wide so I needed approx. 38” of cord).
11. Attach a safety pin to one end of the cord or ribbon and thread it
through the top casing of the bag, run it all the way through both
sides. Now, you can stop here if you like, and have a simple drawstring
bag with pretty cord hanging off one side only. That is perfectly fine
and you can use less cord that way, too.
12. If you want pretty cord hanging off both sides of the bag, then run the cord through a second time. For the second loop, leave some excess hanging out of the open side so you don’t confuse it with the first loop.
13. Cut your loop in half (hint, wrapping a little
piece of tape around the cord and cutting through the middle of it will
prevent it from unraveling). Tie your ends together one both sides and
voila! A simple drawstring bag that takes no time at all to make, but
saves oh so much Christmas waste!
And there you have it!
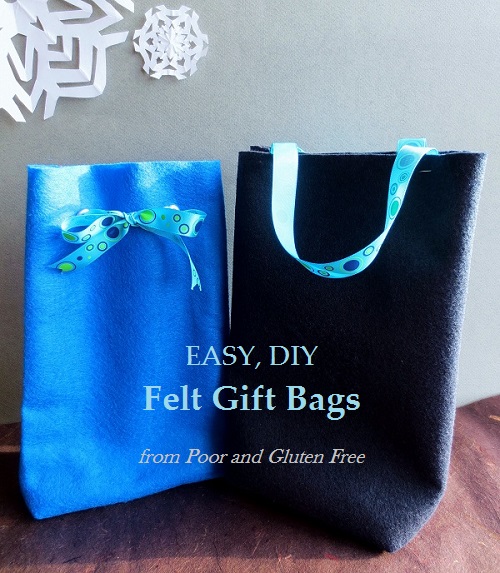
Looking for an even faster gift bag to make?
Check out my tutorial for DIY Felt Gift Bags!
Have you seen my latest novel, The Draughtsman's Daughter? Check it out, and be transported into an action-packed, tomb-raider mystery romance set in Ancient Egypt's Land of the Dead.

No comments:
Post a Comment
I'd love to hear from you so go ahead, leave a comment!